| Pages | ||
|---|---|---|
| Previous | Next | |
| Package alias | Parameter | |
An iKnowBase page, simply referred to as page in this document, enables you to display and receive content from the end user through iKnowBase Page Engine.
A page can consist of various components, such as HTML portlets and Shared content viewers. These components are referred to as portlets.
While creating a page, you can specify the template, path or URL for the page, the ACL reference that sets access permissions for the page, and the portlets that you want to display, such as forms, menus, and content viewers.
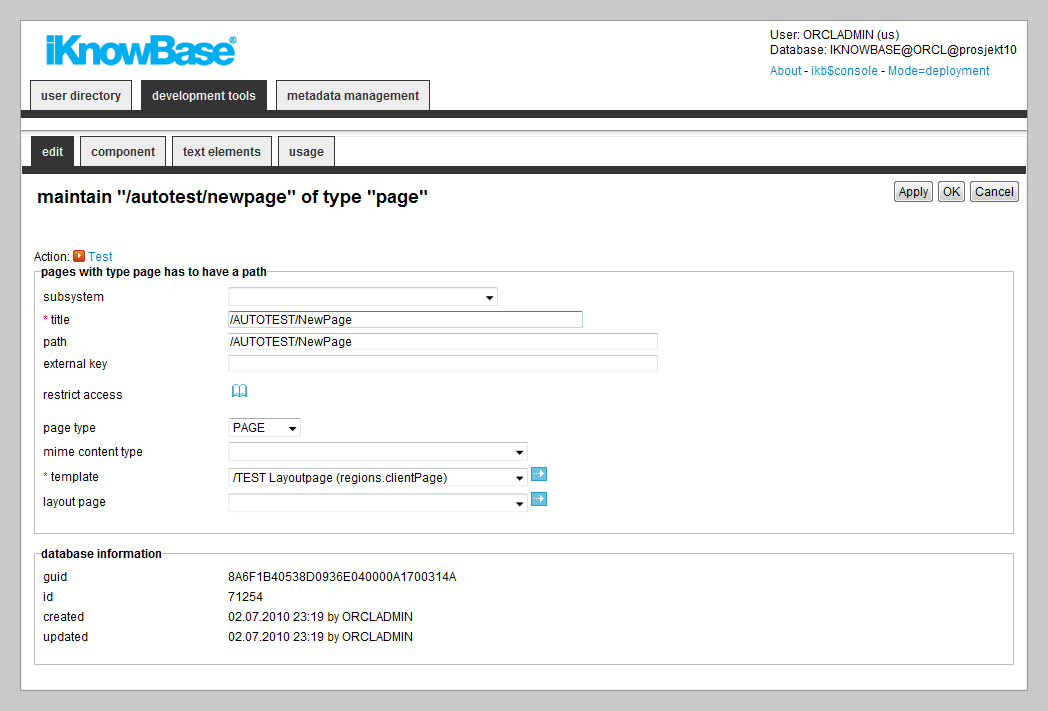
This section describes the properties of a page, as shown on the corresponding Edit pane tabs.
| Property | Description |
|---|---|
| Subsystem |
Select the appropriate subsystem. |
| Title |
Type a title for this page. |
| Path |
Type the reference to the URL that is used to access the page. The reference is relative to the page URL specified on the domain, so the actual URL for a value “/iknowbase/about/” could be http://www.example.com/page/iknowbase/about, but also http://www.example.com/iknowbase.about, depending on your setup. If this field is blank, you cannot access the page directly from a browser. You can still include the path in another page, or use it as a layout page. The path name must be a unique name. |
| External key |
Type the external key. This value is used for external integration. |
| Restrict access |
Select the appropriate access control list (ACL) for the page. To view the page, the user must have read rights to the specified ACL. |
| Page Type |
Click the appropriate page type. This page type specifies whether the page that is created is used as an iKnowBase page or iKnowBase layout page. |
| Mime Content Type |
Click the appropriate content type that identifies the type of content on the page. For example, text/html or text/xml. |
| Template |
Select the template that you want to use for this page. |
| Layout page |
Select the layout page you want to use for this page |
On this tab you add the portlets to display on the page. The template used for the page decides which regions are available for displaying portlets.
You can change the order of the portlets by drag and drop functionality.
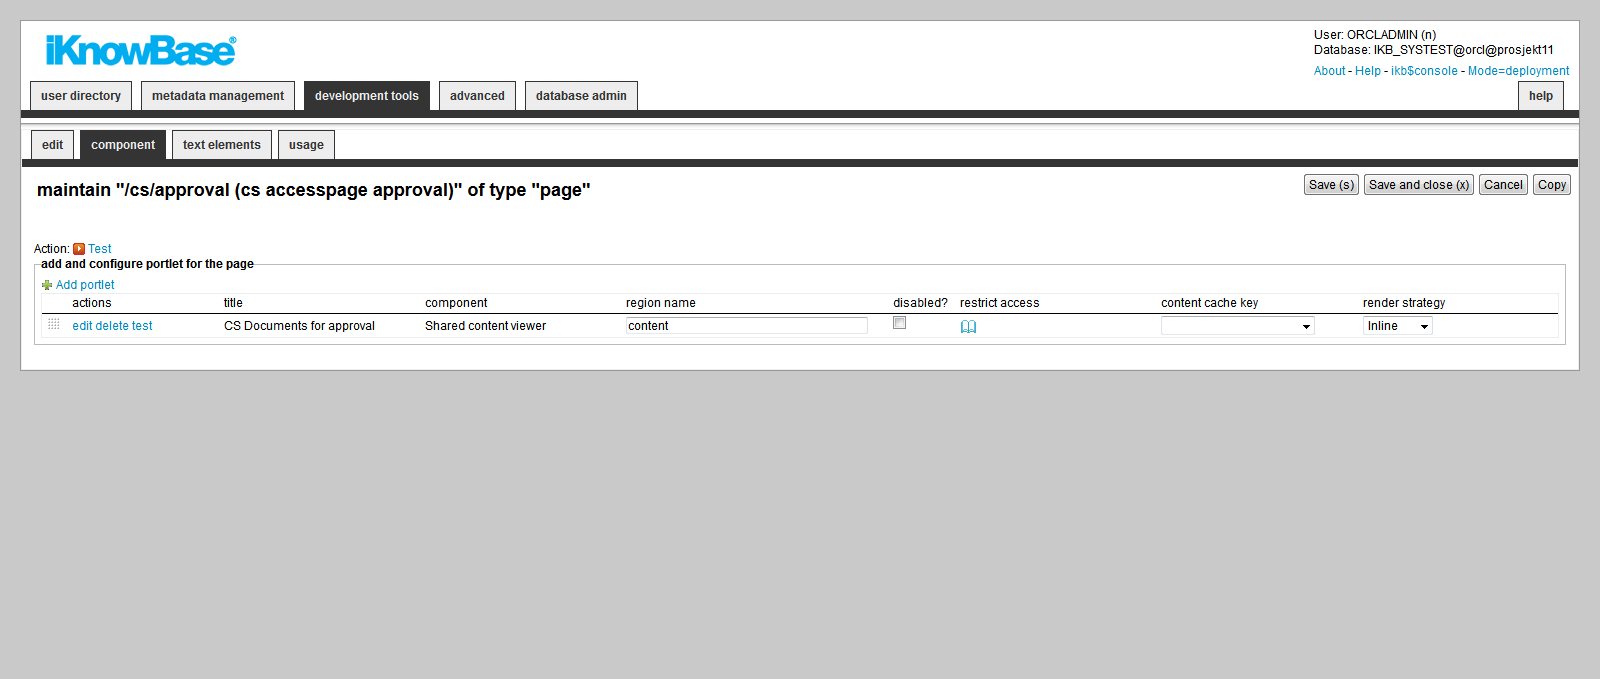
| Property | Description |
|---|---|
| Actions |
|
| Title |
Will either display :
|
| Component |
Displays the portlet type. Note: This is a read-only property. When you click the “Add portlet” link to add a portlet to the page, you choose which type of portlet to be added. |
| Region name |
Type the name of the region where the component is shown. The underlying template can display this component at a location that is predefined in the template. The regions are defined in the template. |
| Markup ID |
Enter an identifier to be used when identifying the component on the web page, or leave blank for an identifier to be automatically generated. The identifier will be used by automatically generated code in certain components, and can also be used as the identifier in the reloadComponent javascript function. Note that if you enter a value here, this value must be unique on the rendered page (including embedded pages and layout pages). Whenever possible, it is recommended that the value is left blank. |
| Disabled? |
Disable the portlet. It will be rendered when running the page. Typically used for debugging reasons. |
| Restrict access |
Select the appropriate access control list (ACL) for the page. The component appears to the end user only if he has read access to the selected ACL. |
| Content Cache Key |
Select the appropriate content cache mechanism to be used for the portlet. Predefined options are:
You can add self-defined options, see the Page cache strategy chapter. Note: If you leave this property blank, the content of this portlet will not be cached. Note: Access control will not be applied to shared cached content. A user who accesses a portlet, which is configured to use shared cache, will see the exact cached content regardless of his access rights. A consequence might be that the user gets access to too much or too little data. |
| Render Strategy |
Select the appropriate render strategy to be used for the portlet. Available options are:
Note: If you specify other render strategies than Inline, portlet decorations will automatically be rendered for the portlet (i.e. a div-tag with id and class attributes). |
The properties on this tab enable you to define texts to be used in the component. The texts are available as FreeMarker model objects from the Template used for the Page. Multiple languages are supported.
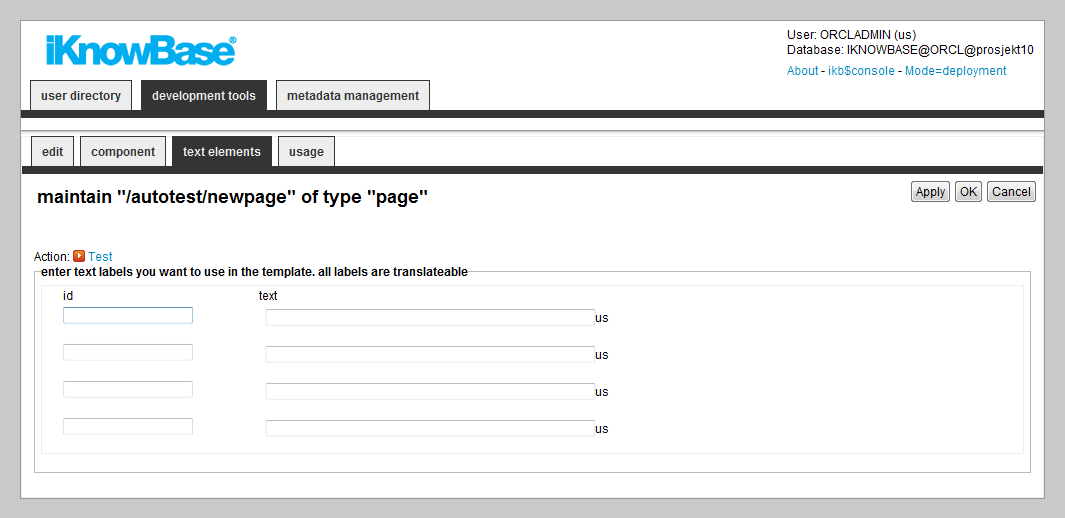
| Property | Description |
|---|---|
| Id |
Type an identifier for the label. |
| Text |
Type the text labels that you want to use in the page. If multiple languages are supported in the solution, each language displays a box, in which you can type the display form name. When you place the cursor in the Text field, the language box appears. The language code is placed behind the field. |
To test your page, either click the Test action for the page on the List pane, or click the Test action link on the Edit pane tabs for the page.
Note: The Test actions become available for a page after you specify a path and perform the initial save of the page.
| Previous | Top | Next |
| Package alias | Parameter |